Rugby positions have always been characterised by the notion that the sport is a game for all shapes and sizes.
Uniquely, all rugby positions requires a different set of physical and technical attributes and it is this diversity which makes the game so accessible to all.
Rugby positions explained:
- Full-back
- Wing.
- Centre.
- Fly-half.
- Scrum-half.
- Number Eight.
- Flanker.
- Hooker.
- Prop.
Here’s how each rugby positions looks on the pitch:
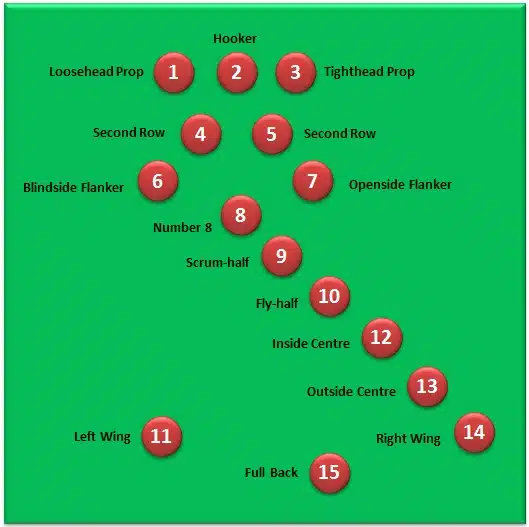
1 & 3 Loosehead and Tighthead Prop
Along with the hooker, the loose-head and tight-head props make up what is known as the front row, which refers to their rugby positions in the scrum.To be successful, both props must be extremely strong in the neck, shoulders, upper body and legs, and they should relish head-to-head competition.
While stopping their side of the scrum from moving backwards, the props also support the hooker’s body weight, allowing him or her to see and strike the ball when it is put into the scrum. In the lineout, props should be able to support or lift the jumper to prevent the opposition winning the ball.
Away from set pieces, props help to secure the ball when a player has been tackled, so it helps if they can combine their power with a degree of mobility. You’ll also often see them used as battering rams in attack, receiving short passes and hitting the opposition defence at pace in an attempt to occupy the defenders and make space for the more athletic players
2 Hooker
Lining up in the scrum between the two props, the hooker is one of the forwards’ key decision-makers. He or she will coordinate the timing at the scrum, and is also responsible for winning possession in the scrummage by hooking the ball back through the props’ legs.
At the lineout he or she is responsible for throwing the ball in and must be able to accurately hit the lineout jumper who is expecting the ball. In open play the hooker plays a similar role to the props, securing possession at rucks and mauls, or taking short ‘crash’ passes.
4 & 5 Lock/Second Row
The second row forwards (also known as locks) are the engine room of the scrum and the target men in the lineout, meaning that they need to be tall, powerful players with excellent scrummaging technique and pinpoint timing.
If they bind to each other and the props too loosely in the scrum their pack will lose power, and if they are not accurate and dynamic with their lineout jumping, it offers the opposition forwards a chance to steal possession. In open play the second row’s duties have evolved from being support players at rucks and mauls to ball carriers.
6 & 7 Flanker/Wing Forward
Flankers are often considered to be the players with the fewest set responsibilities, but as such must be excellent all-rounders with inexhaustible energy. Speed, strength, fitness, tackling and handling skills are all vital.
Out of all the rugby positions, they are more often than not at the centre of the action – winning balls at the ruck and maul, collecting short passes from tackled players and making their own big tackles in open play. While they can rarely be blamed for a loss, they can certainly be the key to victory.
The open-side flanker plays on the far side of the scrum from the touchline and is often smaller in size than their blind-side partner, making them more mobile around the pitch. The blind-side flanker tends to have bigger, more physical role.
8 Number Eight
Support play, tackling and ball-carrying are the No.8’s areas of expertise, making his or her duties similar to the two flankers. Together the trio forms a unit called the back row.
Binding on right at the back of the scrum, the No.8 is also the only player from the forwards who are allowed to pick the ball up from the base of the scrum.
It is a move that is often used to gain vital yards when a team is scrummaging close to the opposition try line, and for it to be truly effective the No.8 must be an explosive, dynamic runner.
9 Scrum-Half
Acting as the link between the forwards and the backs, the scrum-half is the key rugby positions when it comes to building attacks. Playing just behind the forwards, a good scrum-half will control exactly when the ball is fed out to the backs from the rear of a scrum, ruck or maul.
The playmaker needs good vision, speed and awareness, quick hands and lightning reactions. They tend to be one of the smaller players on the pitch and so rely on protection from their own forwards. An indecisive or poorly protected scrum-half makes easy meat for a rampaging opposition flanker.
10 Fly-Half
The heartbeat of the side and arguably the most influential player on the pitch. Almost every attack will go through the fly-half, who also has the responsibility of deciding when to pass the ball out to the centres and when to kick for position
A number 10 must orchestrate the team’s back line, deciding what rehearsed moves to put into action and reacting to gaps in defence. The fly-half also has to be able to relieve territorial pressure by kicking down the field into touch, and is often the team’s designated placekicker for conversions, penalties and drop goal attempts.
In defence, he or she will marshal the backs to ensure each opposition player is covered, and a strong-tackling stand off can snuff out opposition attacks before they start.
11 & 14 Wing
Playing out wide on the side of the pitch, the winger is a team’s finisher in the attack. A winger is also often the last line of defence when they don’t have the ball and as such, pace is their major resource.
12 & 13 Centre
The inside centre – who stands closest to the fly-half when the backs line up – and the outside centre tend to be strong, dynamic runners with a good eye for exposing gaps in the opposition defence. In attack they tend to run very direct lines.
The centres take on their opposite number in an attempt to either break the defensive line, or draw in enough opposition defenders to create space and try-scoring opportunities for their team-mates. As such they need to be strong and powerful, and when attack turns into defence, they must also be accomplished at tackling.
The inside centre is often the more creative in a centre pairing and should be able to pass and kick nearly as well as the fly-half. Meanwhile, the outside centre tends to be the faster of the two and the ability to offload the ball quickly to the wingers is also vital.
15 Full-back
Lining up behind the entire back line, the fullback is the closest thing that rugby has to a sweeper in defence. But they also receive deep kicks from the opposition, so they must be comfortable catching high balls and launching attacks from the resulting possession.
This high-pressure rugby positions is not for the faint-hearted, but those who can combine tackling, kicking, catching and running with a cool head can excel here.
If you want to be more engaged while watching a rugby game, consider bringing custom enamel badges with rugby elements!